And so I just completed my first ever photo shoots! It was for a couple who have dated for quite a while. I am friends with them both which made the communication quite natural and hopefully put them at ease. We shot after lunch hour till around 4PM at Stanley Park, Vancouver, mainly beside the rose garden. For those of you unfamiliar, Stanley park is one the biggest parks in Vancouver, immediately adjacent to the downtown core. I just sent them the photos for them to preview and they both loved them very much and I got a lot of thanks for that!
So on the side of giving the rundown of this photo shoot, I just want to call out for more models - single or couple! Whether you need it for memories or professional purposes (job hunting), or even just some fun, I'm all here for you! I'm basically giving photo shoot session + ALL of the shots I took for free. All I ask for is this learning experience for me, give me a shout out if you liked the photos, and maybe supporting me by giving me permission to post the photos on website (you absolutely do NOT have to, and you can sue me if I did it against your permission LOL!)
Now, onwards with the juice of this post!
The Details
Location: Stanley Park, Vancouver
Weather: Gorgeous sunny day with some clouds.
Time: Afternoon, Late April
Equipment: Canon 550D (T2i) with Canon 50mm F1.8 prime lens + Vivitar Soft Filter for some shots.
Subjects: Dating couple
Some Lessons Learnt
1. Aperture
I shot with a 50mm prime throughout, primarily using large aperture for nice bokeh (blurring effect). However, since it is for 2 people, I used mostly F3.2 just so we get both people in focus.
2. Getting the "Natural" Look
I am friends with both of the couples so I did not have trouble communicating ideas at all. The girl was very natural at posing while the guy started out slightly awkward (a common thing you will find when shooting couples I suspect). To overcome that, I usually give them a pose that I want them to try out, and give them a few minutes to settle in. At this point, I will tell them I will take a few shots. After a few shots, I will look down on my camera while they talked. But what I'm REALLY looking for was not the pictures I just took, but them. Usually this is the moment they are most natural and unsuspecting. Sneaking a few shots during this time is great if you didn't get the result you wanted during the first time.
3. Lighting
I used mainly back lit lighting as the scattered light gives off smooth and well defined features on their faces. For girls, it really shows off the smooth skin and pretty features.
4. Dealing with Imperfections
The girl had very nice skin, with 1 pimple that she was concerned about. I attached a smooth filter to deal with that. However, while it DID work on giving the skin and background grass a better look, it did NOT remove the pimple at all. As a result, I removed it in post-production which worked out like a charm (easy and effective). Having some makeup (foundations/cover ups) with me in the future may not be a bad idea!
5. Showing your Results
There's nothing more important than getting instant feed back from your models - after all, they are your star. I found showing them the photos you took is a very effective way to do this, especially with modern dSLR. It definitely keeps them excited and interested because now they know they will look nice in your photos and they want more!
Things I Need Improvement On
1. Poses
One of the biggest challenges I had was coming up with poses for the couple to try out. I was glad that I had an album with some sample poses I downloaded off of internet on my cell phone. Some poses worked, some did not. I think what I need are eyes that will spot out beauty (in terms of poses) and brain that will be able to come up with styles I want.
As a result, I will be learning more about the BASICS on what works and what does not in a pose for portrait. eg. how can I show the intimacy? How do I show off girl's waist line? etc etc.
2. Intentional Incorporation of Scene
Second most important thing is probably how to better incorporate the model into a scene in a very intentional way. ie. creating a very lively shot with smiling couples, active poses amidst colourful flowers; showing a passionate, intimate couple with a very simple, deserted scene emphasizing on their love requires nothing but each other. etc etc.
3. Diverse Use of Lighting
Lastly, I want to try incorporate more uses of lighting including back lit fill, side light or direct sunlight. I really think that will take my shots to a new level.
I think that's all for now! Now I challenge YOU to do the same! Take some photos for YOUR friend. It will not only benefit you as a photographer, but also leaving your friends a happier person/couple.
Showing posts with label guide. Show all posts
Showing posts with label guide. Show all posts
Tuesday, May 03, 2011


Wednesday, April 13, 2011
A stable tripod goes a long way
 Today I will be introducing one member of the very limited gear selection that I actually own - Ravelli APGL3 Professional Tripod
 .
.Acquisition:
 I got this bad boy on Amazon.com and got it shipped to Point Robert's Letter Carrier and bussed down to pick it up! For those of you who are unfamiliar with Letter Carrier, it is one of many reception services provided near the boarder for Canadians to shop on US website and have it delivered to them for a small fee (~$3).
Price:
Now I paid $55 for this guy but now I checked Amazon it's $83.69 + shippings. I suggest maybe wait for a while, and see if the price drops. If it does not, 90 dollar is well worth the money as well!
What will you get?
Included in this package is the tripod, a carrying bag, and a mini-tripod that the company usually gives out as gift.
Some Specs:
- Extended Length: 70.25"
- Folded Length: 25"
- Diameter: 45"
- Tripod Weight: 2.5 LBS
- Head Weight: 6LBS
- Shipping Weight: 10LBS
Good Impression:
Weight/Stability
The very first thing you will notice is just how heavy this thing is. With a massive 10 lbs weight (compared to the usual 2-3 lbs. tripod), this guy is a tank and is so stable that it won't drop your gears in any conditions.
Padded Legs
The legs are padded which give it a very good grip. I don't feel it being heavy even when I grab it with one hand.
Fluid Head
The head is super fluid that I would take videos with it any day. There is absolutely no comparison to the tripods you get for 80 bucks at Future Shop.
Some Cons:
Weight
If you are traveling uphill or travelling with tripod, then this might not be your top choice due to the weight. For some girls out there, this might be a lot to carry as well. My thought, however, is that if you go travel, don't bring a tripod at all! The IS that comes with your zoom lens or a F1.8 prime would suffice for almost any scenario. Don't let your camera gear get in the way of your travelling!!!
Assembled Head
I think this is the ONLY complaint I have for this tripod. The 3 knobs you see on the pictures are actually detachable, and it will ONLY fit in the bag if you detach them... It becomes a hassle if you are super concerned about having the tripod fit snuggly in the bag. What I started doing is simply let the head sticks out. Still very practical as it won't get in the way and at the same time people won't think I have a sniper rifle on my back!
Conclusion:
If you are looking for a super stable tripod that will withstand any sorts of punishment, this is your guy. Ravelli APGL3 Professional Tripod in my opinion is well worth its money and I have had very good experience with it.
in my opinion is well worth its money and I have had very good experience with it.If you liked the review please help me by either buying the tripod from the links on my website (help me the most), or click on the google ads to the side, or even just coming back from time to times to check my new blog posts!
Monday, April 11, 2011
Compact Camera Shopping for Dummies
This is a guide to those who can't make up their mind in purchasing their camera. If you already know which one you want, go with your heart!
As a technology geek, my favorite shopping spot, of course, includes future shop. As I browse, however, I was often disappointed with the salesmen who knows next to nothing about cameras trying to offer their "advice" on which camera to get to people who are starting out. Of course, the big selection of point and shoot each with their own unique features do NOT help. So hopefully I can make this guide as comprehensive as possible by simply giving you 1 or 2 choices based on your budget!
$0 - $200
This is what I call an anything goes zone. Mainly because whatever camera you end up getting is probably not going to be that different. If you are in this budget range, then chances are you are going to use your camera for very simple day-to-day shooting: capturing parties, touring and etc. The main thing you should be looking for is fast start up time - the time it takes from the moment you press on/off button to when you can actually taking photos. I've found that incredibly useful as it makes miss as little shots as possible. My suggestion is to stick with Canon or Nikon as they are the 2 big names in making consumer products. You can't go wrong with them.
Conclusion:
- Stick with Canon/Nikon.
- Test out start up time.
- Whatever looks good!
$200-$300
 You are looking for a point-and-shoot for day-to-day use, but also cares about your image quality now. After reading a bunch of reviews and thinking about experiences using friends' cameras, I have decided to root for Canon PowerShot ELPH 300 HS 12 MP
Price: $279 at Best Buy or Amazon.ca
Appearance: Comes in Black, Silver, and RED! =)
Lens: 24-120mm 35mm eq. focus range will serve most every day need (this is your zoom range); f2.7-f17 aperture.
Speed: This is where this camera shines when compared to other similar cameras. It takes ~2 seconds to start up and ~2 seconds to recycle between picture.
Low light scenario: You can never expect a compact point and shoot to compare with a DSLR in low light situation, but Canon ELPH 300 can do fairly well as it can shoot without showing visible noise at ISO 800. That means you can't see the grainy dots even at fairly high light sensitivity level.
Conclusion: Canon PowerShot ELPH 300 HS
$300-$500
 So you want to get a nice point-and-shoot or maybe you are thinking about getting a prosumer camera (the ones with big lens but can't change them). Well think no further, my advice is, don't waste your money in getting a prosumer - save the money and buy yourself something nice! (If you HAVE to get a prosumer for some reason, check out the Canon G12 10MP).
 Instead, get a top of the line, state of the art point and shoot! In fact, some point and shoots are actually better than most of the prosumer and even some of the DSLR. From many reviewers and friends' experience, I strongly suggest the Canon PowerShot S95 10 MP.
Price: $419 at Amazon
Appearance: Only come in black. Manual control ring to control exposure, focus, ISO, etc. precisely.
Lens: 28mm-105mm (35mm eq.) Max. Aperture - f/2.0 (W), f/4.9 (T) - this super large aperture for compact cameras will enable you to take excellent photos even at ISO 3200.
Sensor Size / Resolution: 14.9 mm / 10 MP. Don't get fooled by the "small" pixel number. With only "10MP", it seems to be on the low side of compact cameras nowadays. But the sensor size of this camera is absolutely massive for a compact camera. A big sensor size means you get more "effective pixel" which actually means BETTER image quality!
Other nice features: 720p. HD movie shooting. Miniature (tilt-shift) effect (example of cool photo with this effect).
Conclusion: Canon PowerShot S95 10 MP. (Hands down!)
Well that concludes my very first product reviews and suggestions! I hope that actually helped! I kept it as simple as possible and only showed you 1 product for each category. And if you liked the review please help me by either buying the camera from the links on my website (help me the most), or click on the google ads to the side, or even just coming back from time to times to check my new blog posts!
Thank you very much for reading!
-M
As a technology geek, my favorite shopping spot, of course, includes future shop. As I browse, however, I was often disappointed with the salesmen who knows next to nothing about cameras trying to offer their "advice" on which camera to get to people who are starting out. Of course, the big selection of point and shoot each with their own unique features do NOT help. So hopefully I can make this guide as comprehensive as possible by simply giving you 1 or 2 choices based on your budget!
$0 - $200
This is what I call an anything goes zone. Mainly because whatever camera you end up getting is probably not going to be that different. If you are in this budget range, then chances are you are going to use your camera for very simple day-to-day shooting: capturing parties, touring and etc. The main thing you should be looking for is fast start up time - the time it takes from the moment you press on/off button to when you can actually taking photos. I've found that incredibly useful as it makes miss as little shots as possible. My suggestion is to stick with Canon or Nikon as they are the 2 big names in making consumer products. You can't go wrong with them.
Conclusion:
- Stick with Canon/Nikon.
- Test out start up time.
- Whatever looks good!
$200-$300
You are looking for a point-and-shoot for day-to-day use, but also cares about your image quality now. After reading a bunch of reviews and thinking about experiences using friends' cameras, I have decided to root for Canon PowerShot ELPH 300 HS 12 MPPrice: $279 at Best Buy or Amazon.ca
Appearance: Comes in Black, Silver, and RED! =)
Lens: 24-120mm 35mm eq. focus range will serve most every day need (this is your zoom range); f2.7-f17 aperture.
Speed: This is where this camera shines when compared to other similar cameras. It takes ~2 seconds to start up and ~2 seconds to recycle between picture.
Low light scenario: You can never expect a compact point and shoot to compare with a DSLR in low light situation, but Canon ELPH 300 can do fairly well as it can shoot without showing visible noise at ISO 800. That means you can't see the grainy dots even at fairly high light sensitivity level.
Conclusion: Canon PowerShot ELPH 300 HS
$300-$500
So you want to get a nice point-and-shoot or maybe you are thinking about getting a prosumer camera (the ones with big lens but can't change them). Well think no further, my advice is, don't waste your money in getting a prosumer - save the money and buy yourself something nice! (If you HAVE to get a prosumer for some reason, check out the Canon G12 10MP).Instead, get a top of the line, state of the art point and shoot! In fact, some point and shoots are actually better than most of the prosumer and even some of the DSLR. From many reviewers and friends' experience, I strongly suggest the Canon PowerShot S95 10 MP. Price: $419 at Amazon
Appearance: Only come in black. Manual control ring to control exposure, focus, ISO, etc. precisely.
Lens: 28mm-105mm (35mm eq.) Max. Aperture - f/2.0 (W), f/4.9 (T) - this super large aperture for compact cameras will enable you to take excellent photos even at ISO 3200.
Sensor Size / Resolution: 14.9 mm / 10 MP. Don't get fooled by the "small" pixel number. With only "10MP", it seems to be on the low side of compact cameras nowadays. But the sensor size of this camera is absolutely massive for a compact camera. A big sensor size means you get more "effective pixel" which actually means BETTER image quality!
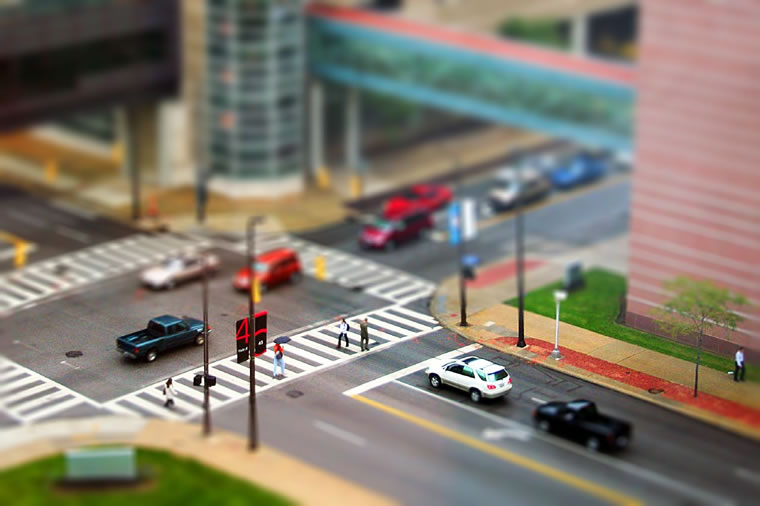
Other nice features: 720p. HD movie shooting. Miniature (tilt-shift) effect (example of cool photo with this effect).
Conclusion: Canon PowerShot S95 10 MP. (Hands down!)
Well that concludes my very first product reviews and suggestions! I hope that actually helped! I kept it as simple as possible and only showed you 1 product for each category. And if you liked the review please help me by either buying the camera from the links on my website (help me the most), or click on the google ads to the side, or even just coming back from time to times to check my new blog posts!
Thank you very much for reading!
-M
Subscribe to:
Posts (Atom)